Do you offer promotions or discounts to new patients or certain groups of patients? For example, 15% off for senior citizens, 25% off for active military or veterans, and so forth. In Dentrix, it’s easy to set up discounts and then apply them in the Ledger where applicable.
Step 1: Set Up Your Discounts
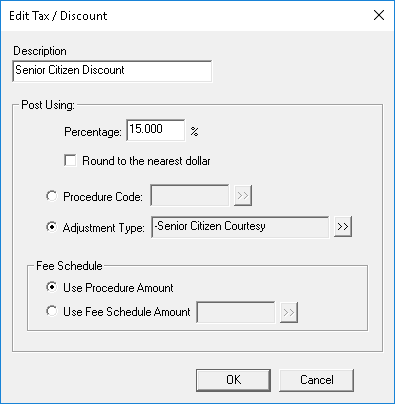
Before you can enter discounts, you’ll need to create the discount types in Dentrix. Open the Ledger, and from the File menu click Tax/Discount Options Setup. Then click New and enter a name of the discount in the Description field. Enter a Percentage amount for the discount, and select an Adjustment Type to be used in the Ledger. Click OK, and the discount type will be available to use for all patients on any networked computer.

Step 2: Post a Discount
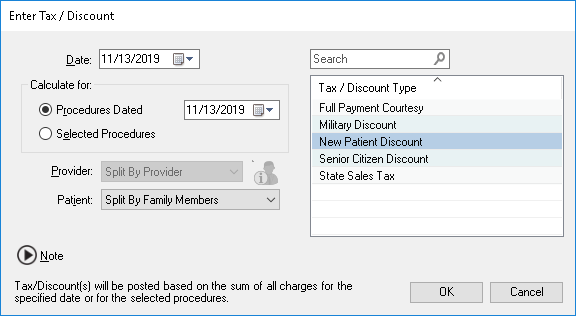
Select a patient in the Ledger. If you are not applying a discount to all of the day’s procedures, select the procedures that you want to discount. Then from the Transaction menu, click Enter Tax/Discount.

Select a discount type from the list. If you selected individual procedures, under Calculate for, select the Selected Procedures option. Otherwise, select Procedure Dated and enter a date. All of the procedure codes for that date will be discounted.
You can use the Provider drop-down menu to select a specific provider, or if the procedures receiving discounts were completed by different providers, choose Split By Provider to let Dentrix automatically divide the credit up among them.
If you’d like to apply the discount to one family member, use the Patient drop-down menu to select that patient, or choose Split By Family Members to let Dentrix divvy up the adjustment to multiple family members.
If you’d like to add a note to give additional information about the discount, click Note and type a note in the box.
When finished, click OK, and Dentrix will calculate the discount amount and post the adjustment(s) in the Ledger.
For additional information, see the Posting Taxes and Discounts topic in Dentrix Help.


