For reasons such as financial cost or insurance coverage limitations, it may be necessary to create alternate treatment plan options for your patients so they can choose to accept one treatment plan or another. Consider a patient, for example, whose treatment for a missing tooth could include either an implant or a bridge.
With the Dentrix Treatment Planner, treatment plans are organized into cases, which are made up of your patient’s treatment plan procedures all grouped together.
Before you can organize the procedures into treatment plan options, you must first post all procedures associated with the patient’s treatment options in the Patient Chart. Then open the Treatment Planner. All treatment-planned procedures for the selected patient are placed in the default case.
To create an alternate treatment plan:
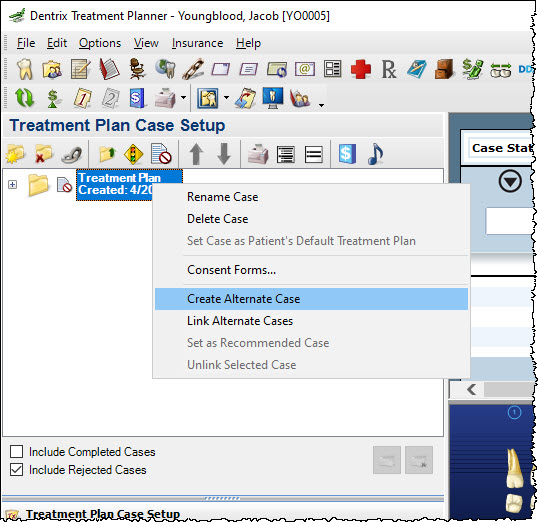
- In the Treatment Planner, right-click the treatment case you’d like to create an alternate case for, and select Create Alternate Case.

- Enter the Name of Alternate Case, and select the procedures that correspond to that case.
Note: The procedures listed in this dialog box are the procedures for all treatment-planned work. All procedures are checked by default. If a procedure does not belong in the alternate case, uncheck it. - Click OK to create the alternate case. The alternate case now appears in the Treatment Plan Case Setup Panel. You can see the procedures contained in the case by clicking the + symbol to expand the case.
Procedures that were added to the alternate case are still part of the original default case as well, and should be deleted from the default case if they are not relevant to that course of treatment.
To delete procedures from a treatment plan case:
- Expand the treatment case by clicking the + symbol to see the list of procedures contained in the case.
- Select the procedure(s) to delete from the case, right-click and select Delete Procedure(s).
- Click OK to the confirmation message that appears.
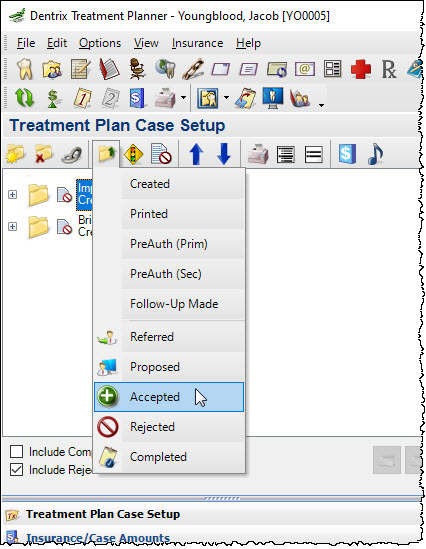
Once you have created the different treatment plan options, you can present each to your patient. You can change the case status to show which case is recommended and which case is accepted by the patient. To set a case as recommended, right-click the case and select Set as Recommended Case. To set a case as the accepted case, click the Update Case Status button and select Accepted.

Note: When you set a case as Accepted, the other cases are automatically rejected. When you set a case as either Recommended or Accepted, only the treatment-planned procedures within that case continue to be visible in the Patient Chart.
For additional information, see the following:
- Creating Alternate Cases topic in Dentrix Help.
- Updating Treatment Case Statuses blog post
- Setting the Recommended Treatment Plan Case blog post


