
Learn why closing the year is so important, get the steps to do it, and discover tips to automate the process.
Ah, the new year! A time of new beginnings, of novel promises and great hopes, and of innovative goals and exciting achievements! For a business owner or office administrator, the new year also brings a list of tasks to accomplish, ranging from filing taxes to updating insurance fee schedules.
Within Dentrix there are some year-end tasks to accomplish as well. Fortunately, these tasks are no different than what you already do (or should be doing) at the end of every month. In this article, we’ll review the list of tasks you need to complete in Dentrix at the end of each year and how to accomplish them.
Fiscal Year or Calendar Year
Before describing the tasks, it is important to point out that some offices use a fiscal year that is different from the calendar year. A fiscal year is reckoned for accounting or tax purposes. This article will assume that your fiscal year is the same as the calendar year—starting on January 1st and ending on December 31st. If your accountant has set you up with a different fiscal year, the principles discussed here still apply; however, know that your year-to-date reporting numbers will restart on a date different than January 1st.
What Does It Mean to Close the Year?
Closing the year in Dentrix is simply a matter of closing the transactions for the last month of the year—it’s actually no different than closing out transactions for any other month.
So, knowing that, here is a description of the tasks involved in closing a month. (In the next section we’ll discuss how to accomplish them).
Essential Tasks to Closing the Month
- Close Transactions – This option prevents further editing of procedures, payments, and adjustments by assigning them to a “History” status. It also updates the aged balance of the accounts (30-, 60-, and 90–days) and calculates month-to-date and year-to-date totals for reports.
- Move Clinical Notes to History – This task locks down unsigned clinical notes so that they can no longer be edited.
- Move Perio Exams to History – This task locks down periodontal exam information so it can no longer be edited.
- Reset Insurance Benefits – This option restarts benefits used and deductibles met for patients with an insurance plan that should reset with the new renewal month.
Optional Tasks to Closing the Month
- Purge Appointments – When this option is selected, appointments older than the displayed cutoff date will be cleared from the Appointment Book. This option is not required for closing the month, but because it’s a popular feature to run monthly or yearly, it is included as a month-end closing option for convenience.
- Apply Finance Charges – For accounts with a payment agreement, assesses the appropriate charges to the Ledger. For patients without a payment agreement, assesses finance charges according to the settings assigned to the task.
- Generate Finance Charge Report – Generates a report for the finance charges. The report appears in the Batch Processor.
- Apply Late Charges – For accounts behind on making payments to a payment agreement, assesses the appropriate charges to the Ledger.
- Generate Late Charge Report – Generates a report for the finance charges. The report appears in the Batch Processor.
- Future Due Payment Plans Update – For patients with a Future Due Payment Plan, will automatically post new charges and create insurance claims.
- Billing Statements – Generates invoices for patients according to the saved task options. The billing statements appear in the Batch Processor, where you can print them from your printer.
Steps to Close the Month Manually (Month End Window)
From the menu bar at the top of the Ledger, click Close Month. The Month End dialog box opens.
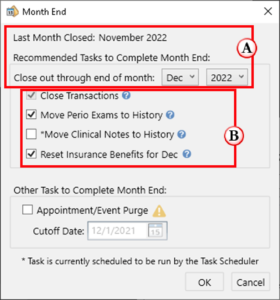
At the top of this dialog box, the last month that transactions were closed is displayed. Using the menu options, choose the month and year you’d like to close (A). Dentrix will close all of the months up through and including the month and year that you select.
Next, select the boxes next to the tasks to be performed (B). If a task is already scheduled to run automatically in the Task Scheduler, an asterisk (*) appears to the left of the task name. If this happens, review the scheduled task in the Task Scheduler and decide whether you want to have it run automatically by the Task Scheduler or manually through the Month End process.
Finally, click OK to run the selected tasks.
The Month End dialog box includes all of the essential tasks, but only one of the optional tasks. If there are other optional tasks you want to perform, you will run them using the Task Scheduler (discussed in the next section).
Steps to Close the Month Automatically (Task Scheduler Window)
The Task Scheduler allows your office administrators to choose which tasks to run automatically. Typically, a task will be set up to run overnight. Think of it… while you are busy partying into the new year, Dentrix will be hard at work closing out the old year for you!
You will set up your task scheduler ahead of time. From the Office Manager, choose Maintenance, then click Task Scheduler (Month End).
Under Scheduled Tasks, Dentrix will have automatically assigned the essential and optional month-end tasks under the Monthly queue and assigned them to a “suspended” status.
To make a suspended task active, right-click the task and select Resume Task. It becomes active and will run with other active tasks as part of the monthly queue.
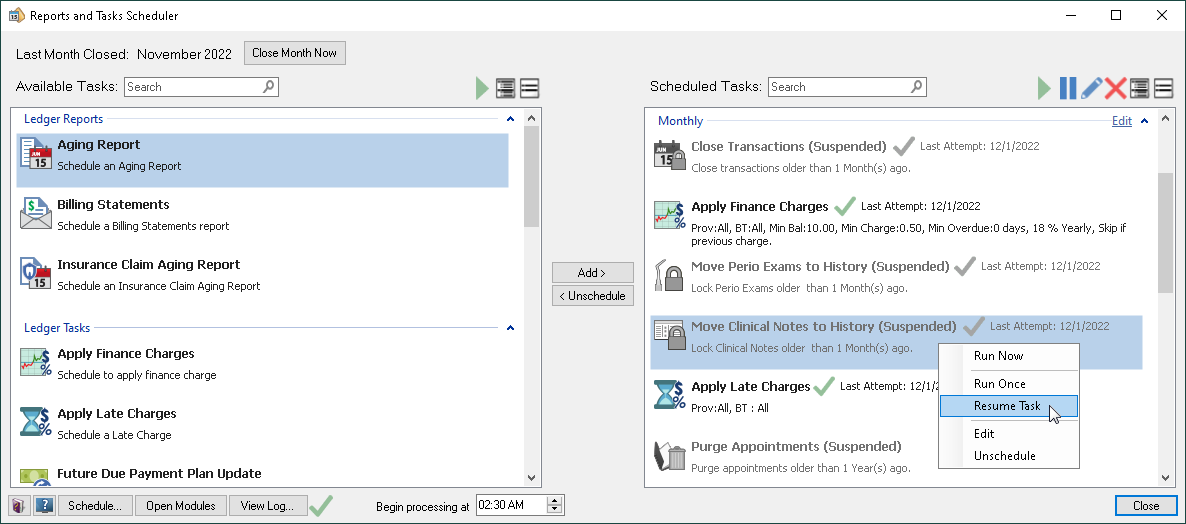
It is a good idea to verify the settings for each active task to make sure they are performed to your office’s preference. Right-click any active task and select Edit to review or change the task’s settings.
If you see an active task that you would prefer not to run automatically, right-click the task and select Suspend Task.
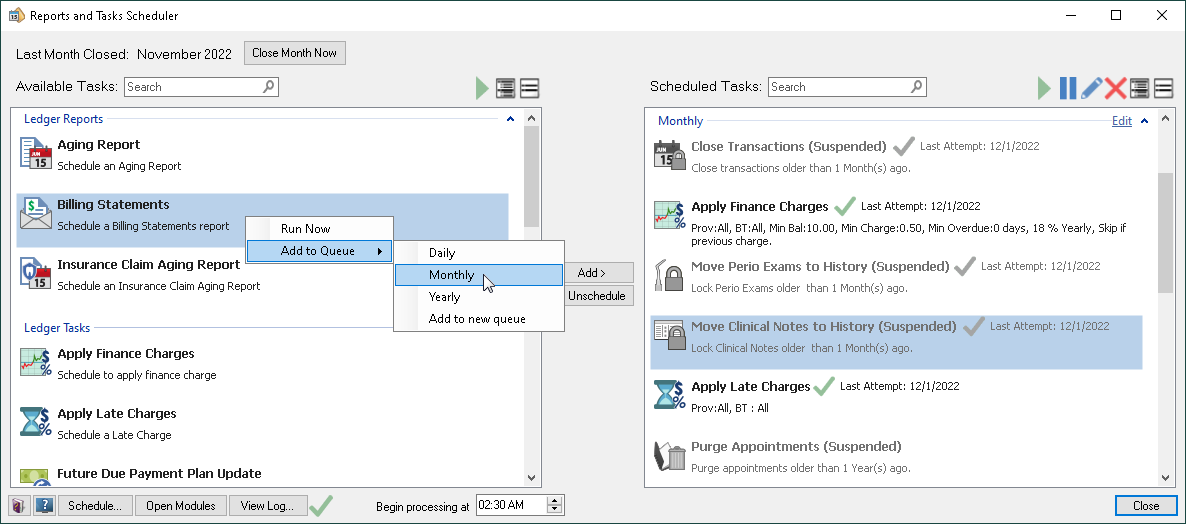
If there is a task that you want to perform as part of month end, but it is not found in the scheduled list, find it under Available Tasks. Right-click the task and click Add to Queue). Follow the prompts by selecting the Monthly queue, then choosing the settings that the task will run with.
The Begin processing at time at the bottom of the window shows the time when all active tasks in all queues begin running.
When you are finished setting up the desired tasks within the Monthly queue, close the Reports and Task Scheduler.
Year End Reports
Many offices like to run reports that summarize the previous year’s information. These can provide insights that help you make important decisions.
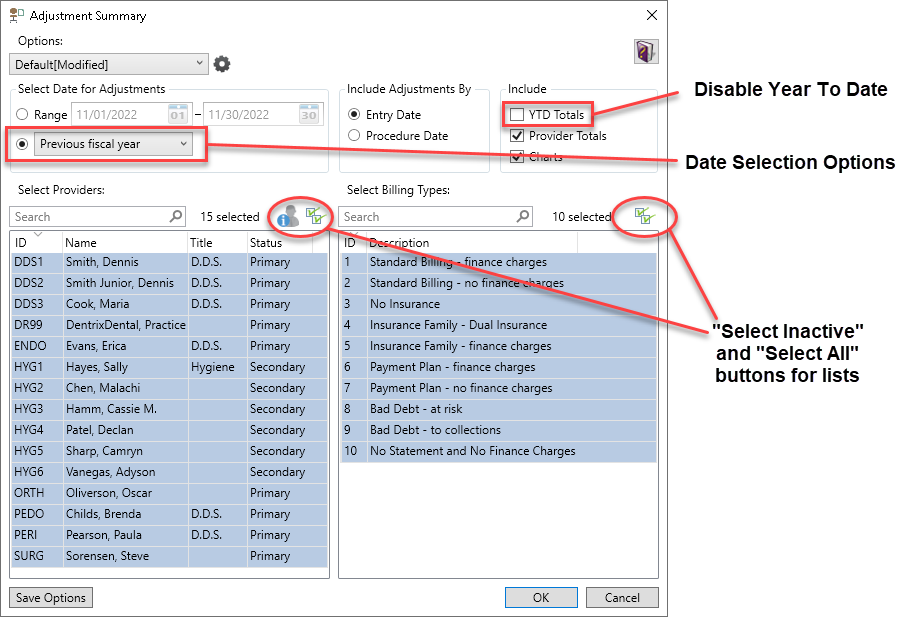
There are several great reports located in the Dentrix Reports module. From the Office Manager, click Analysis and then click Dentrix Reports. Double-click any report to open that report’s options. Under Select Date for Adjustments, choose Previous fiscal year from the drop-down menu. If the report offers year to date (YTD) options, turn those off to simplify the report by removing the current new years number comparison. Remember to select all Providers and Billing Types so you can get a complete report for your practice.
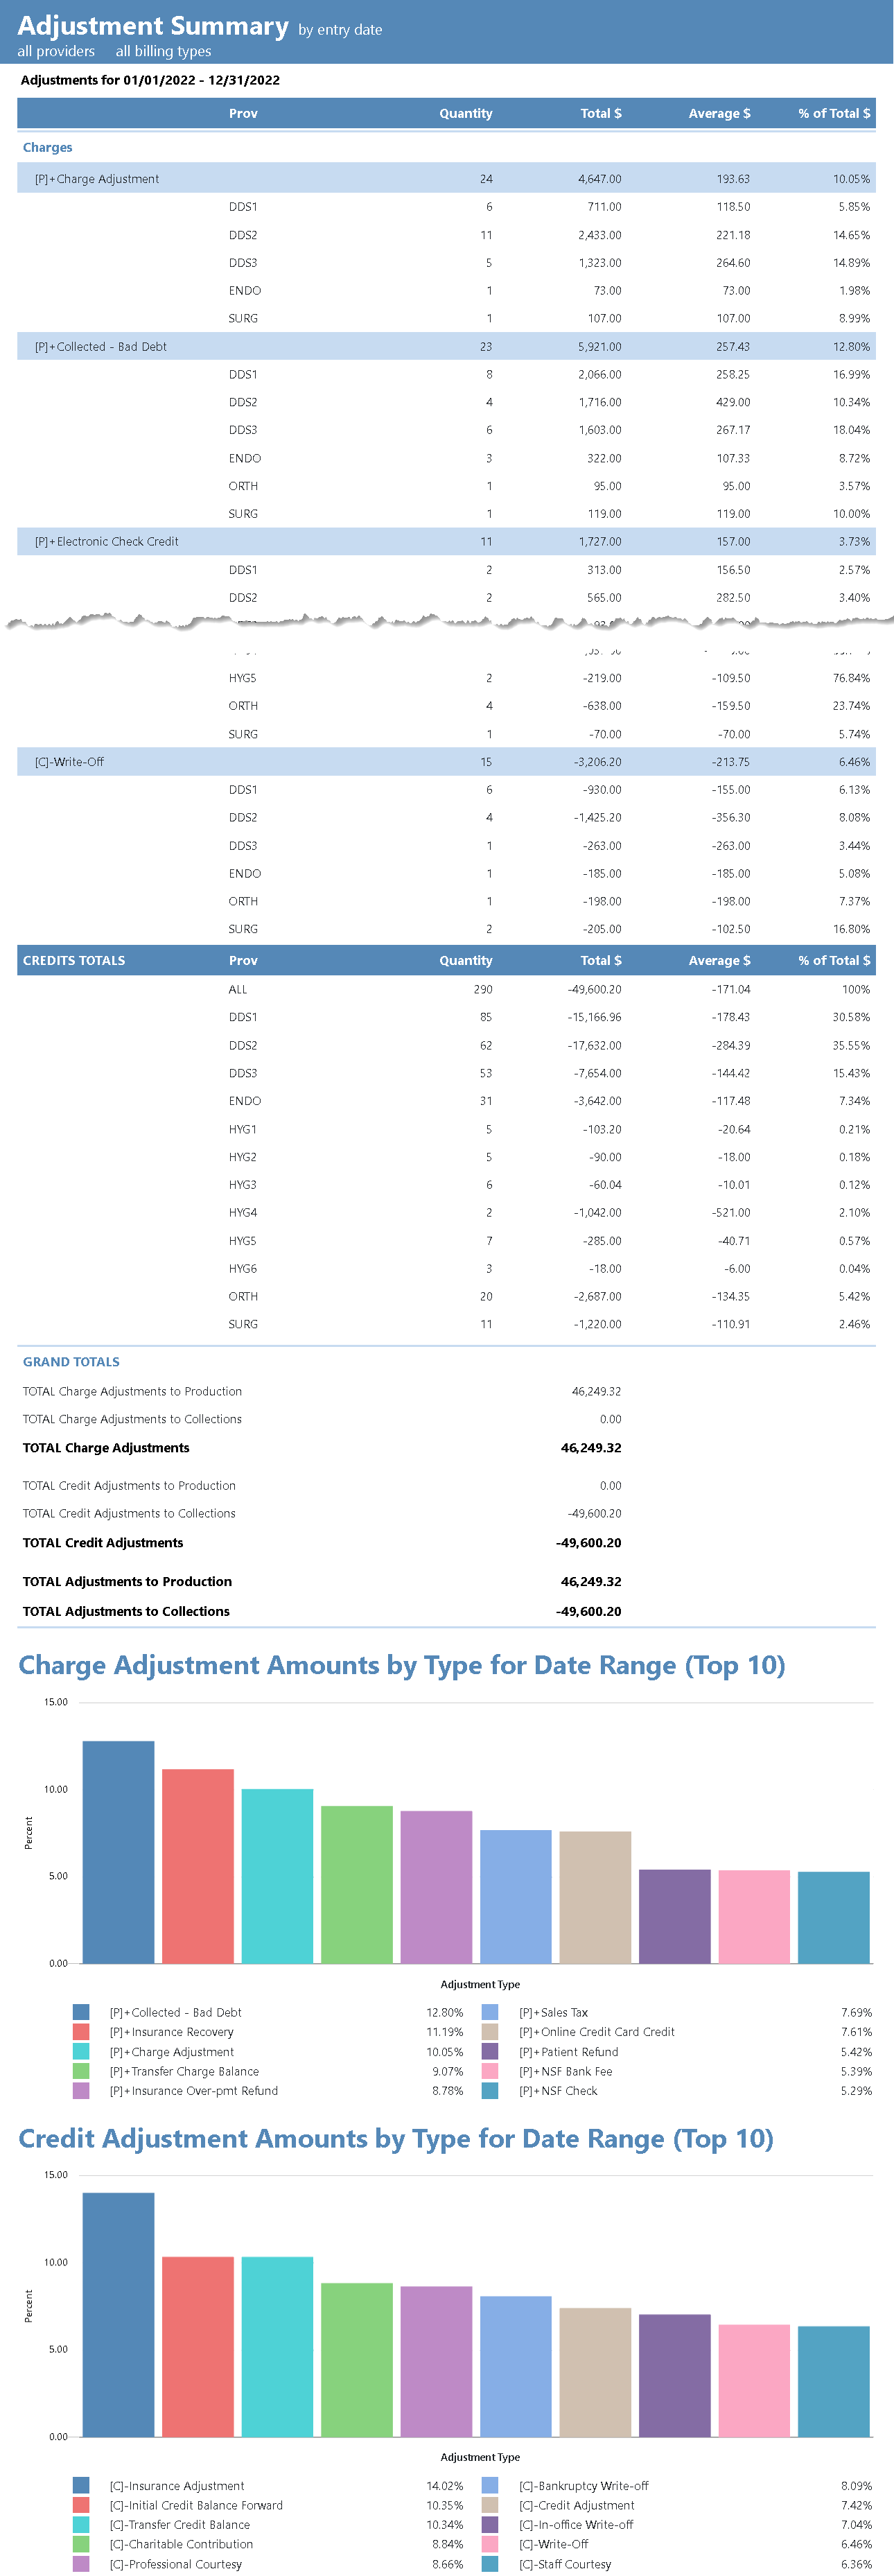
Adjustment Summary Report
This report lists all types that were used during the year. You’ll see the total number of times the adjustment type was applied to any patient’s ledger (quantity), the total dollar value that represented, the average each time that adjustment was applied, and the percentage this adjustment type represents out of the total dollars of all adjustments. Then the report offers a breakdown of the same totals for each provider.
Payment Summary Report
This report lists all payment types that were used during the year. You’ll see the total number of times the payment type was applied to any patient’s ledger (seen as Quantity on the report), the total dollar value represented by this payment type, the average dollar amount each time that payment type was posted, and the percentage this payment type represents out of the total dollars of all payment types. Then the report offers a breakdown of the same totals for each provider.
Idea for use: If you don’t have very many patients using a credit program, you might stop accepting that payment type entirely to help reduce your overhead.
Procedure Summary Report
This report lists all procedures that were posted complete during the year. You’ll see the total number of times the procedure was applied to any patient’s ledger (seen as Quantity on the report), the total dollar value represented by this procedure, the average dollar amount spent per procedure, and the percentage of the total dollar amount this procedure represents among all of the procedures. Then the report offers a breakdown of the same totals for each provider.
Idea for use: This is a great way to see what procedures you are performing in your office, and which are most popular and most profitable. If the report shows that you perform a lot of one type of procedure, you might think about investing in better equipment to help in the new year. Likewise, the report might show that one of your providers excels in completing certain types of work over other providers.
Provider Aging Report
Many offices want to keep a record patient and provider balances as of year-end. The Provider Aging report is an excellent way to do that! This report lists each account balance, then breaks down the balance or credit for each provider.
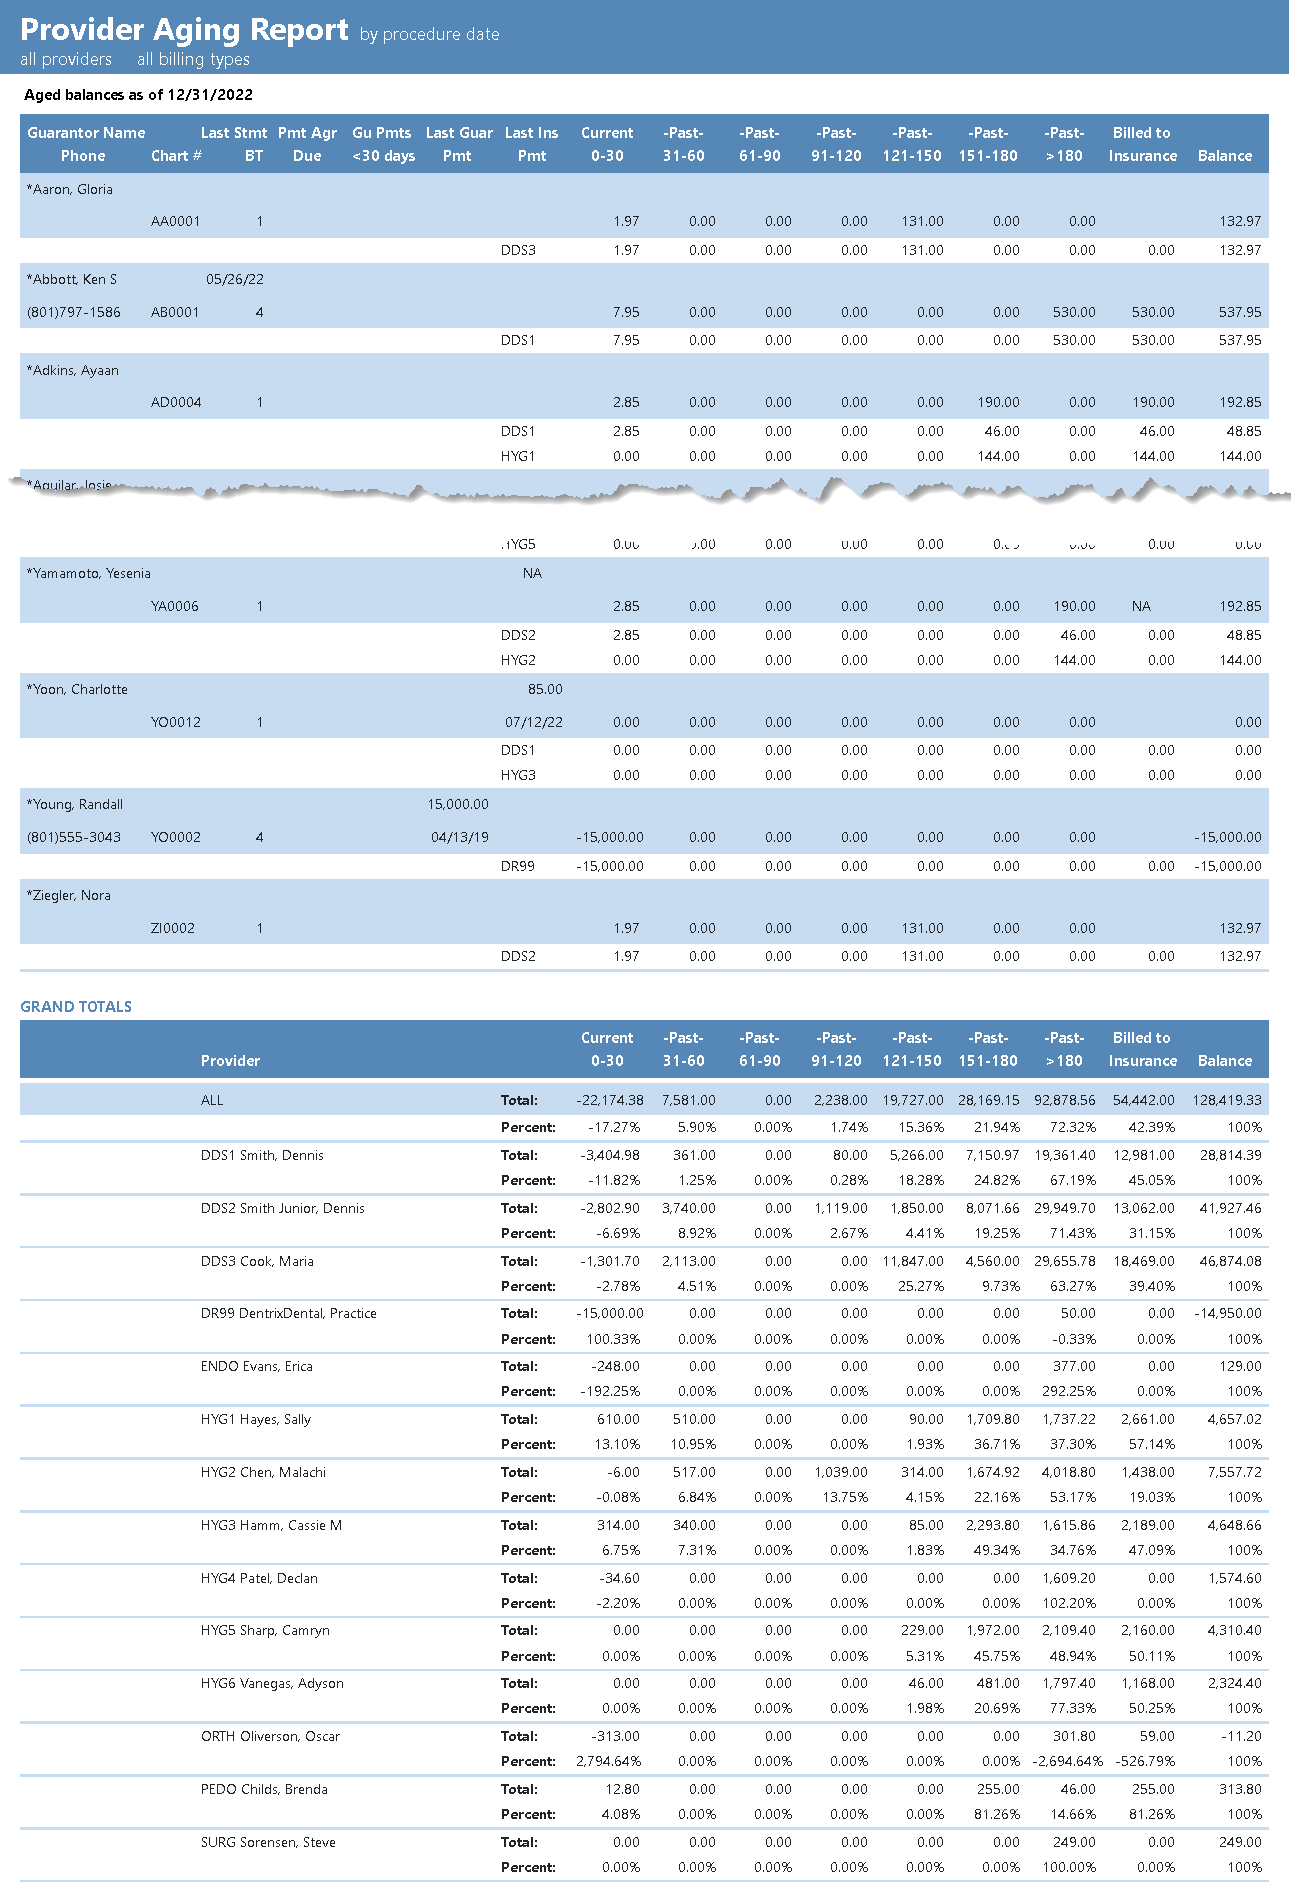
Are you seeing a lot of credits and owed balances within the same accounts, you might consider making allocating those credit balances a project for your new year!
Insurance Transaction Analysis
This report will provide you a high-level overview of the insurance plans your office used. As you select the options, pay close attention to two checkboxes: Itemize Claims and Include Claim Transactions. If you select neither, the report will display each carrier as a row with totals on that row. If you select Itemize Claims, underneath each insurance carrier will be additional rows for each patient who had a claim (one row for each patient). If you also select Include Claim Transactions, your report could be overwhelmingly long, as it will include the claim details for each of those patients. Choose carefully according to the amount of detail you want (or preview it all three ways to see what you like best).
![]()
Idea for use: The new year is a good time to assess the usage of each insurance plan and decide if some plans are worth keeping or dropping. This report gives you information to inform those decisions.
Frequently Asked Questions
Can others be using Dentrix while I close the month?
In older versions of Dentrix, you had to shut down all other Dentrix modules on all computers before starting the month-end processes. In newer versions, shut down is not required anymore, but it’s still a good idea to keep extra or unnecessary Dentrix windows closed, as month-end tasks require significant amounts of the server’s attention and resources. If other workstations are trying to use Dentrix simultaneously, overall computer performance may be delayed. Fortunately, the task scheduler allows you to schedule these tasks to run in the middle of the night, so no one needs to be inconvenienced anymore! Just close out Dentrix (or shut down other computers entirely) before you leave for the night.
Should I back up the database first?
The month-end closing tasks can affect a significant portion of patient information spread throughout the Ledger, Patient Chart, and Family File. We highly recommend that you create a backup copy of your database before running the month-end processes. That way, in the unlikely event that something goes wrong during the month-end process, you can recover a copy of your database and continue working with minimal impact. If you’re unsure how to back up your database, the Henry Schein One TechCentral team can help you!
If my office is shut down for the last week of the year, can I close the month/year early?
You must wait until at least the first day of the new month. There may be times when it would seem nice to close the month early, such as when your office shuts down for the year’s final week, but it is just not possible to proceed until on or after the first day of January.
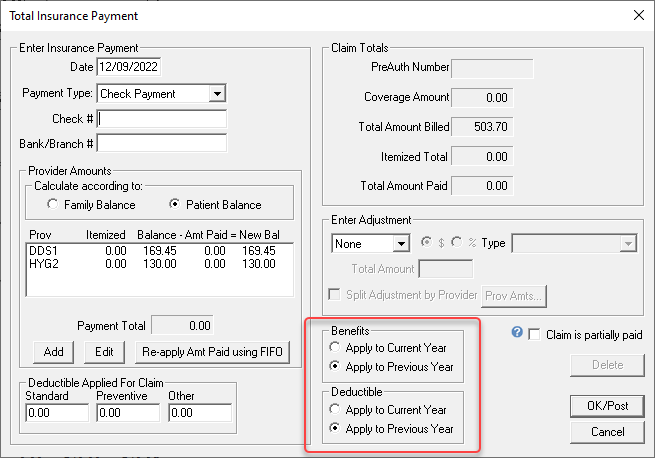
What do I do with outstanding insurance claims from the previous year?
When you post payments or adjustments to claims from the previous year, you will notice the option to apply the benefits to the previous year or the current year. This option defaults to the previous year.
Do I have to do this on New Year’s Day, the first day of the month? We are not coming back in until the 3rd – can it wait until we get back?
If you close the month automatically using the Task Scheduler, you don’t need to worry about this. But if you run the processes manually, it is okay to wait a day or two until you come back to the office. It is even okay if your team begins to use Dentrix before you get a chance to close the year. Just keep the following in mind if you delay closing:
- Insurance estimates will still show the previous year’s used benefits and met deductibles.
- Aging displayed in the Ledger or on reports may not accurately reflect the current, 30-, 60-, and 90-day brackets.
- Reports that include month-to-date, year-to-date, or previous month totals may not be accurate.
- Transactions, perio exams, and unsigned clinical notes may be susceptible to changes.
- Insurance plans cannot be purged until the payments associated with the claims are closed.
These issues will resolve themselves when you finally catch up on the month close processes.
I applied finance charges or late charges but used the wrong settings. Can I reverse those charges?
Yes, options to Delete Finance Charges and Delete Late Charges are found in the Maintenance menu of Office Manager.
Do I need to have all clinical notes written and signed before I close the year?
While it would certainly be a good idea, it is not required to have all clinical notes written or signed before closing a month or a year. You will still be able to sign existing notes. If you discover a missing note, you can create a new note and change the date of the note back to the correct date of service – even if it is part of a prior closed month.
Don’t forget to use the Signature Manager! This tool can simplify the process of verifying that clinical notes were created and signed!
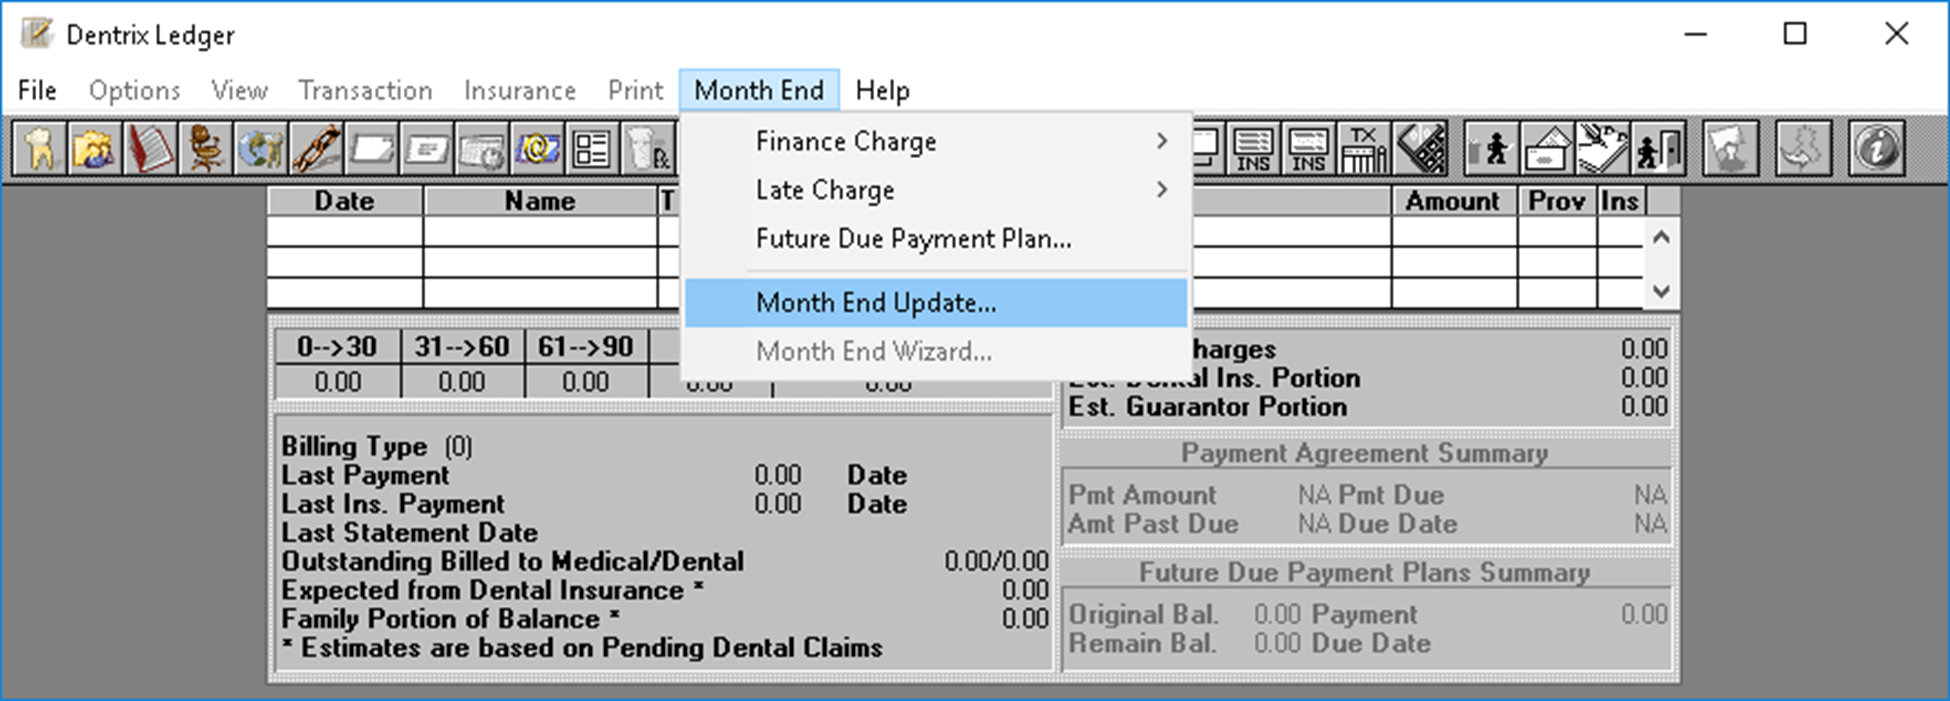
The version of Dentrix I run is really old. How do I close the month?
In versions of Dentrix before August 2017, you’ll see the “Month End” option at the top of the Ledger. From the menu, select Month End Update.
The Close Out Month window will display the next month and year to be closed. You have two options: Appointment Purge and Reset Insurance Benefits. The other essential tasks we discussed earlier (Close Transactions, Move Clinical Notes to History, and Move Perio Exams to History) are automatically completed in this process—you cannot pick and choose between these tasks in older versions.
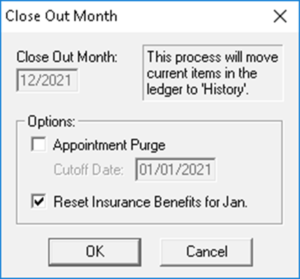
At this screen, you can safely press cancel if you’re not yet ready to close the month. But if you click OK to proceed, you must let the process finish completely! All other workstations must stay completely closed out of Dentrix while it runs.
This Close Out Month window will close one month with each running. If you are not current in closing the months, repeat the process for each month you are behind until you catch up to the current month. If you are several years behind, contact Dentrix Customer Support and ask about scheduling a call with a senior support representative to assist you by running a utility.
The other optional tasks are either found in the Ledger’s Month End menu, or within the Office Manager’s Reports menu.
Conclusion
No matter if you schedule the tasks or run them manually, closing the year in Dentrix is an easy resolution to complete this new year! Closing the months and year will set your financials and insurance estimates on the right foot, and lock down procedures, notes, and exams from editing or tampering. Dentrix Reports will give you easy-to-read data that allows you to unlock trends and insights to make informed goals and decisions for your practice. Happy New Year!
Learn More
For additional information, read the following :
- Watch our on-demand webinar titled, Closing the Year in Dentrix to learn more about what you need to do to prepare and get the steps for closing the fiscal year.
- If you are running older versions of Dentrix, read Closing the Year in Dentrix.
- For more information about closing the year with the reports and tasks scheduler, see the Running Month-end Procedures topic in Dentrix Help or watch the Dentrix G7.5 Task Scheduler tutorial.
- See the article titled, Schedule Routine Tasks and Reports to Run Automatically for more information about using the Reports and Task Scheduler in Dentrix.
By Ryan Beardall, Contributing Editor


