
Learn why closing the year is so important, get the steps to do it (no matter which Dentrix version you are using), and discover tips to automate the process.
Ah, the new year! A time of new beginnings, of novel promises and great hopes, and of innovative goals and exciting achievements! For a business owner or office administrator, the new year also brings a list of tasks to accomplish, ranging from filing taxes to updating office fee schedules.
In all of your new year’s considerations, you’ll need to plan for some tasks in your Dentrix software too. Fortunately, these tasks are no different than what you already do (or should be doing) at the end of every month. We’ll review the list of tasks you need to complete in Dentrix at the end of each year and how to accomplish them in this article.
Watch the on-demand webinar recording titled, “Closing the Year in Dentrix” to learn more about what you need to do to prepare and get the steps for closing the fiscal year.
Fiscal Year or Calendar Year
Before describing the tasks, it is important to point out that some offices use a fiscal year that’s different from the calendar year. A fiscal year is reckoned for accounting or tax purposes. This article will assume that your fiscal year is the same as the calendar year—starting on January 1st and ending on December 31st. If your accountant has set you up with a different fiscal year, the principles discussed here still apply; however, know that your year-to-date reporting numbers will restart on a date different than January 1st.
To verify your fiscal year setting in the Practice Information section, open the Office Manager and click Maintenance > Practice Setup > Practice Resource Setup. Be aware that if you change this setting, you may also need to run recalculate totals according to your fiscal year. In Dentrix G6.5 and newer, you can do this by running the Recalculate Totals task found in the Task Scheduler. In earlier versions, the support team can assist you in running a utility to edit and recalculate your totals.
Closing the Year
Closing the year in Dentrix is simply a matter of closing the transactions for the last month of the year—it’s no different than closing out transactions for any other month.
While Dentrix recommends that you run the month-end tasks as soon as a new month begins, it’s okay if your team uses Dentrix before you get a chance to run them. But until you complete the tasks, keep the following in mind:
- Insurance estimates may still carry over from the previous year’s benefits and deductibles.
- Aging displayed in the Ledger or on reports may not accurately reflect the current, 30-, 60-, and 90-day brackets.
- Reports that include month-to-date, year-to-date, or previous month totals may not be accurate.
- Transactions, perio exams, and unsigned clinical notes may be susceptible to changes.
- Insurance plans will not be able to be purged until the payments associated with the claims are closed.
Eventually, these issues will be resolved when you finally catch up on closing transactions and resetting insurance benefits.
So knowing that, what are the steps to close a month?
Essential tasks when closing the month include:
- Close Transactions – This option prevents further editing of procedures, payments, and adjustments by moving them to a “History” status. It also updates the aged balance of the accounts (30-, 60-, and 90–days) and calculates month-to-date and year-to-date totals for reports.
- Move Clinical Notes to History – This task locks down unsigned clinical notes so that they can no longer be edited.
- Move Perio Exams to History – This task locks down periodontal exam information so it can no longer be edited.
- Reset Insurance Benefits – This option restarts benefits used and deductibles met for patients with an insurance plan that should reset with the new renewal month.
- Purge Appointments – When this option is selected, appointments older than the displayed cutoff date will be cleared from the Appointment Book. This option is not required for closing the month, but because it’s a popular feature to run monthly or yearly, it is included as a month-end closing option for convenience.
Recommendations Before You Begin
Close Other Dentrix Windows – In the oldest versions of Dentrix, you had to shut down Dentrix before starting the month-end processes. In newer versions, shut down is not required anymore, but it’s still a good idea to keep extra or unnecessary Dentrix windows closed, as month-end tasks require significant amounts of the server’s attention and resources. In addition, if other workstations are trying to use Dentrix simultaneously, overall computer performance may be delayed. Fortunately, newer versions of Dentrix allow you to schedule these tasks to run in the middle of the night, so no one needs to be inconvenienced anymore! Just close out Dentrix windows before you leave for the night.
Back up the Database – The month-end closing tasks can affect a significant portion of patient information spread throughout the Ledger, Chart, and Family File. Dentrix highly recommends that you create a backup copy of your database before running the month-end processes. That way, you can recover a copy of your database—and continue working with minimal impact—in the unlikely event that something goes wrong during the month-end processes.
Wait Until the First of the Month – Before you can close a month, you must wait until the first day of the new month. There may be times when it would seem nice to close the month early, such as when your office shuts down for the year’s final week, but it is just not possible to proceed until the first day of January.
Steps to Close the Month
The steps will be a little bit different depending on the version of Dentrix that you’re using. Presented below are the steps the following Dentrix versions:
- Dentrix G7.5
- Dentrix G6.5 through Dentrix G7.4
- Dentrix G6.4 and earlier versions
If you are not sure which version you use, just look at the top of your Ledger and find the matching illustration in the sections below.
Dentrix G7.5
When you see separate “Task Scheduler” and “Close Month” options at the top of the Ledger, you have two ways to close the month.
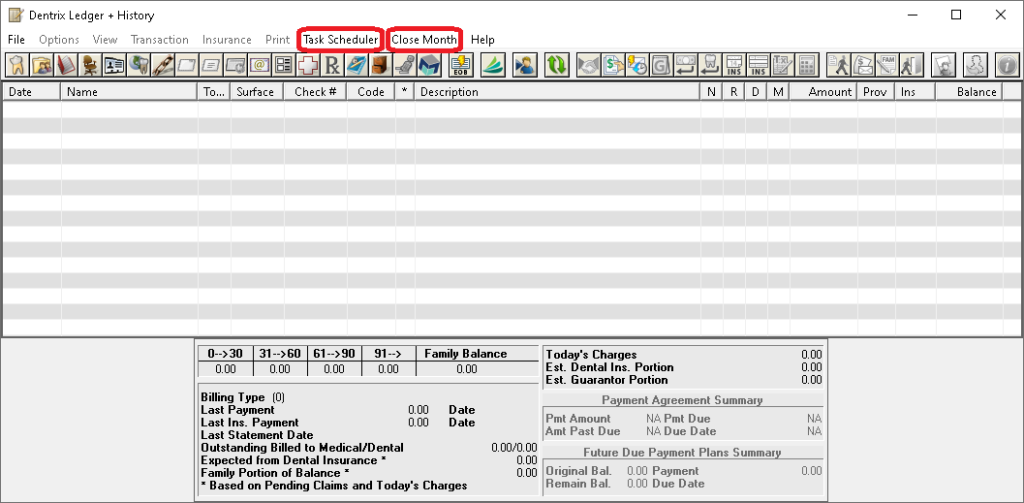
THE CLOSE MONTH OPTION
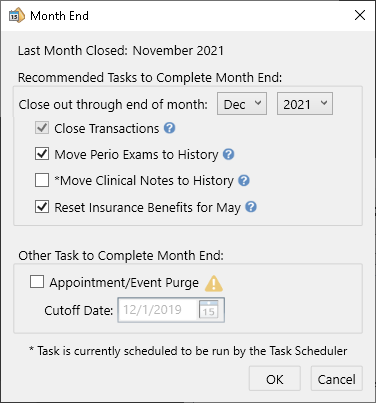
Click Close Month, and the Month End window will greet you. At the top of this window is displayed the last month that transactions were closed. Using the menu options, choose the month and year you’d like to close. Dentrix will close all of the months up through and including the month and year that you select.
Next, check the boxes next to the tasks to be performed. If a task is already scheduled in the Task Scheduler, an asterisk (*) will be seen to the left of the task name. If this happens, review the scheduled task in the Task Scheduler and decide whether you want to have it run automatically by the Task Scheduler or manually through the Month End process. Finally, click OK to run the tasks.
THE TASK SCHEDULER OPTION
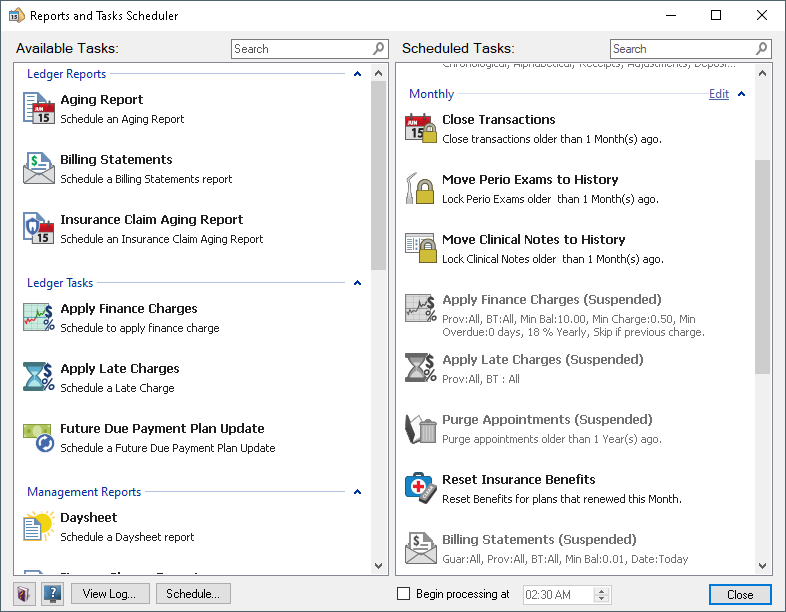
The Task Scheduler allows office administrators to choose which tasks to run automatically. Typically, a task will be set up to run overnight.

Under the Scheduled Tasks column, Dentrix automatically assigns the essential month-end tasks under the Monthly queue using a “suspended” status. To make a suspended task become active, select the task and click the Suspend/Resume task button (the button image looks like a Pause symbol on your phone’s music app). If the task is not found in the scheduled list, find it in the Available Tasks column and click Add to schedule it.
Observe the “Begin processing at” time at the bottom of the window—this is when all active tasks in all queues begin running.
Think of it… while you are busy partying into the new year, Dentrix will be hard at work closing out the old year for you!
The Task Scheduler – Dentrix G6.5 Through Dentrix G7.4
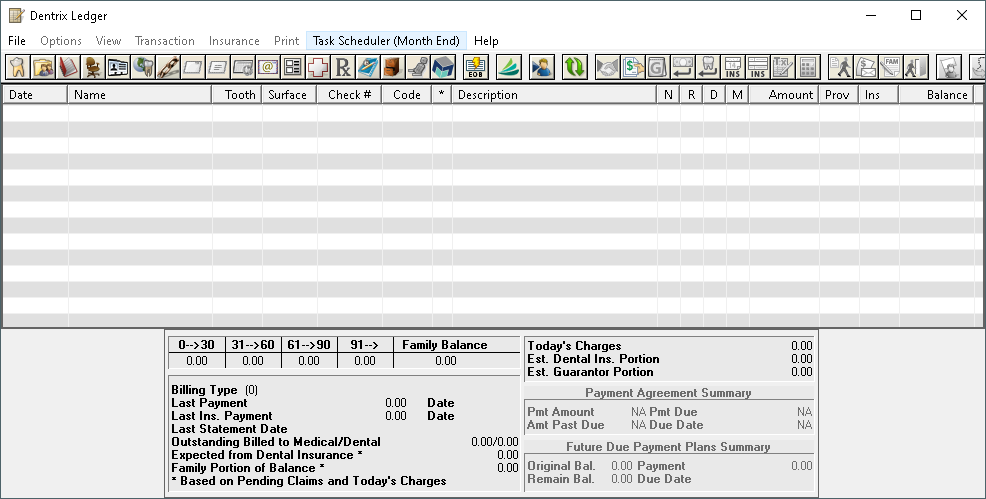
In these versions, you’ll see “Task Scheduler (Month End)” option at the top of the Ledger.
The Task Scheduler allows office administrators to choose which tasks to run automatically. Typically, a task will be set up to run overnight.
Under the Scheduled Tasks column, Dentrix automatically assigns the essential month-end tasks under the Monthly queue using a “suspended” status. To make a suspended task become active, right-click the task and select Resume Task. If the task is not found in the scheduled list, find it in the Available Tasks column and right-click it. Choose Add to Queue and follow the prompts.
At the bottom of the window, select the “Begin processing at” checkbox and observe the time—this is when all tasks in all queues begin to run.
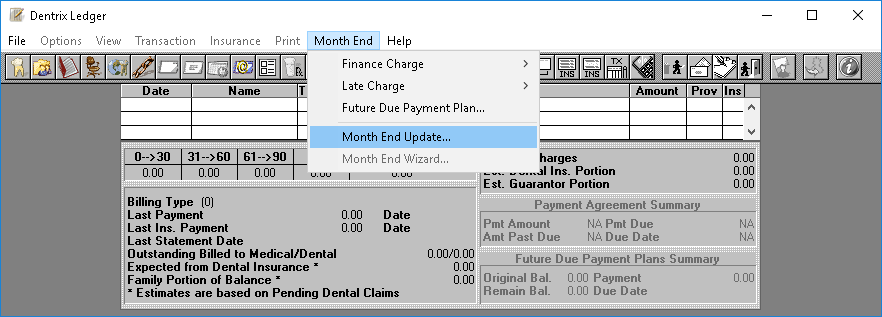
Month End Update – Dentrix G6.4 and Earlier Versions
In these versions, you’ll see the “Month End” option at the top of the Ledger. From the menu, select Month End Update.
The Close Out Month window will display the next month to be closed and offers you the following options: Appointment Purge and Reset Insurance Benefits. The other essential tasks we discussed earlier are automatically completed in this process—you cannot pick and choose tasks in these versions.
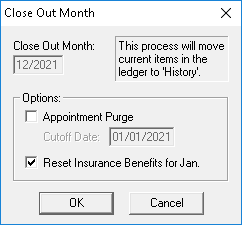
At this screen, you can safely cancel if you’re not yet ready to close the month. But if you click OK to proceed, you must let the process finish completely! All other workstations must stay completely closed out of Dentrix while it runs.
These versions can only close one month at a time. If you are behind a few months, you’ll need to repeat the Month End Update function again for each month. If you are several years behind in closing your months and cannot yet upgrade to a newer version of Dentrix, catching up months one-by-one is a daunting thought. Instead, contact the support team and ask about scheduling with a senior support representative to help catch your months up using a utility!
Conclusion
No matter if you schedule the tasks or run them manually, closing the year in Dentrix is an easy resolution to complete this new year! Closing the months and year will set your financials and insurance estimates on the right foot, and lock down procedures, notes, and exams from editing or tampering.
Learn More
For additional information, read the following :
- Watch the on-demand webinar recording titled, “Closing the Year in Dentrix” to learn more about what you need to do to prepare and get the steps for closing the fiscal year.
- Watch an overview video of the Month End/Year End process.
- Click here if you’re using Dentrix G7.5 or higher.
- Click here if you are using Dentrix G6.5 or higher.
- Click here if you are using Dentrix G6.4 or any previous versions of Dentrix.
- Read Closing the Year in Dentrix
- For more information about closing the year with the reports and tasks scheduler, see the Running month-end procedures topic in the Dentrix Help.
By Ryan Beardall, Contributing Editor


