
As the doctor in your practice, you went to dental school to create beautiful smiles and improve the health of your patients. However, you are still a business owner, and knowing what is going on in your business is certainly worth your time.
A doctor once e-mailed me about a situation that needed some attention. Her clinical team had started posting procedures in the Patient Chart and had accidentally posted a root canal as “complete” rather than “existing.” The root canal was not only posted to the patient’s Ledger, it was also sent electronically to the insurance company and paid. The patient called the practice, concerned about the EOB that he received and wondering why the office had billed his insurance company for a root canal that they hadn’t performed. When the doctor asked me what kind of safeguards she could put into place for her clinical team, my first response was to remind her that this was an administrative error, not a clinical one.
Dentrix reports give you the visibility into your practice that you need as a business owner. The Day Sheet is one such report.
You should run the Day Sheet at the end of each business day to review the Ledger transactions and production totals for that day. If the doctor in the above story had looked at the Day Sheet in Dentrix, she would have noticed that the root canal was incorrectly billed out, and it never would have been sent to the insurance company. The clinical team can also use the Day Sheet to see if something was missed, such as X-rays, pulp caps, or build-ups.
To generate the Day Sheet:
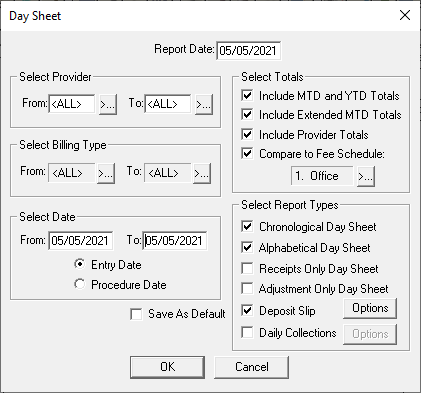
- In the Office Manager, select Reports > Management > Day Sheet (Charges and Receipts) or click the Day Sheet Report button.

- Under Select Provider, select a provider range.
- Under Select Billing Type, select a billing type range.
- Under Select Date, enter a date range and mark the desired option for either Entry Date or Procedure Date.
- Entry Date includes all transactions entered into the database within the selected date range. The Entry Date Day Sheet includes both an Entry Date and Procedure Date column as well as an amount for the Previous Balance, Balance as of, and Net Change.
- Procedure Date includes all transactions dated within the selected date range. Most of the time, the entry and procedure date for a transaction are the same date. However, if a procedure was back-dated, then the entry and procedure date differs.
- Under Select Totals, check the desired options:
- Include MTD and YTD Totals includes a running balance for the month and year.
- Include Extended MTD Totals includes the average production per patient and average charge per procedure.
- Include Extended MTD Totals includes the average production per patient and average charge per procedure.
- Compare to Fee Schedule allows you to select a fee schedule to compare to the transaction charges for the selected day.
- Under Select Report Types, check the desired options:
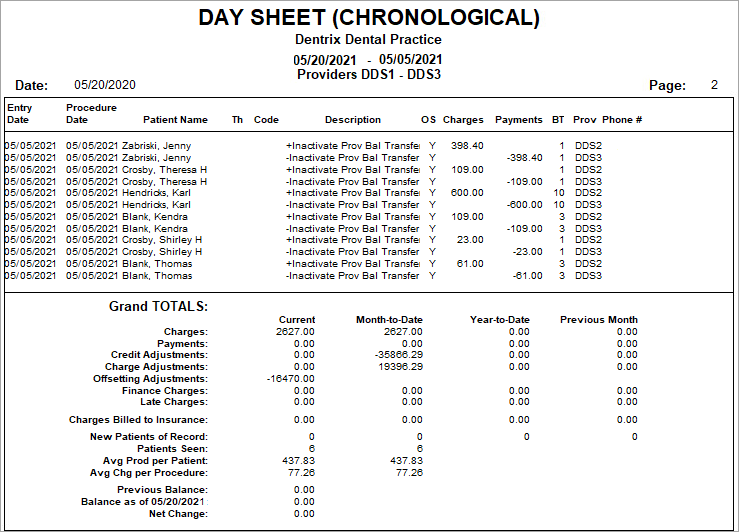
- Chronological Day Sheet prints payments, procedures, and adjustments for the selected date range. Transactions are listed in the order they were entered into Dentrix.
- Alphabetical Day Sheet prints payments, procedures, and adjustments alphabetically by patient’s last name for the selected date range.
- Receipts Only Day Sheet prints payments for the selected date range.
- Adjustments Only Day Sheet prints adjustments for the selected date range.
- Deposit Slip prints a deposit slip. To select the payment types included on the Deposit Slip, click Options to select the desired payment types.
- Daily Collections prints daily payment and adjustment transaction types. Click Options to select which payment and adjustment types to include.
- Check Save as Default to save these settings for future use.
- Click OK to send the report to the Batch Processor and return to the Office Manager.
For more information about running and reading the Day Sheet, view the Day Sheet topic in Dentrix Help.


